Showing posts with label Blogger. Show all posts

April 24, 2010

Optimize Blogger Title Tag for SEO

The default Blogger will shows your blog title first to the people when they search for some random or specific keywords using Google or Yahoo. In another words, if you have 700 posting on Blogger and 400 posts get indexed by Google, all your 400 postings will look almost identical in Google's results page.

Most people enter a keyword or keywords in the search engines and when the results are out. They look at the result and guess, probably he or she will just make a bet to enter the site or not. Therefore, what is the likely thing that they will look for to make sure it is a safe bet before they click on the result link? The title! Exactly, I guess a 6th grader like me had figured it out.

Blogger Title Tag for SEO

Imagine, you had written some damn awesome tutorials about dog feeding and instead of "How to feed a Chi Wawa?” the search results page displayed "JennPetGarden - How to feed a Chi...." That goes to all your 400 "un" SEO postings. This SEO hack is the basic hack I believe every blogger on Blogger’s blog should use. Periods

The Method:
Log in to your Blogger’s dashboard, click on ‘LAYOUT’ tab and click on ‘EDIT HTML'. (Don't have to expand the widget templates).

Find this line near the top;
<title><data:blog.pageTitle/></title>

and replace with;
<b:if cond='data:blog.pageType == "index"'>
<title><data:blog.title/></title>
<b:else/>
<title><data:blog.pageName/></title>
</b:if>

click 'SAVE TEMPLATE' and you done.

This piece of code basically tells the search engines to display your blog's title if it is at the homepage. If it is at any pages other then the homepage, it will display the post's title instead.

Variation 1 - Displaying your post title followed by your blog title.

<b:if cond='data:blog.pageType == "item"'>
<title><data:blog.pageName/> | <data:blog.title/></title>
<b:else/>
<title><data:blog.pageTitle/></title>
</b:if>

Variation 2 - Customizing your results.
You can add your own text to the results as well. Look at the below code, it is so fun.
<b:if cond='data:blog.pageType == "item"'>
<title><data:blog.pageName/> | <data:blog.title/></title>
<b:else/>
<title><data:blog.pageTitle/> | First Online Pet Shop</title>
</b:if>

HOWEVER, I believe variation 2 is not friendly with Yahoo. What do you think?

Credit: BloggerBuster SEO Title

If you like this posting, please share with your friends.
Link To This Post:
Read more

April 19, 2010

How to display HTML codes in Blogger - Convertor Tool

This is a simple post/tool for Bloggers who sometimes want to display their HTML code for various reasons. When you use a HTML code, Blogger will automatically execute the code. One reason could be that Bloggers may want to display a ‘link to me’ HTML code without executing the code. So here is how, just paste the HTML or JavaScript code in the first text box below and click on CONVERT. The second text box will display the converted format. Just cut and copy the converted code and place them anywhere you like as a widget or in a blog post.

Blogger Tools


Retain Formatting (Not recommended for long codes.)

Raw Code


Converted Code

If you find this tool useful, you can...
Link To This Complain:
Read more

Simplest Method to Display an Image Rollover in Blogger

This is the simplest method to display an image rollover. An image rollover is just changing image when the mouse is over the image. It is just a random trick that I decided to share. You can use them in your Blogger post or as a normal widget.

Demo

Here is the method :
<center><a href="http://YOURLINK.blogspot.com/">
<img src="IMAGE_1_SOURCE_URL" alt="YOUR_IMAGE_DESCRIPTION" title="YOUR_IMAGE_DESCRIPTION"
onmouseout="this.src='IMAGE_2_SOURCE_URL'"
onmouseover="this.src='IMAGE_1_SOURCE_URL'"/></a></center>

Just change the section in red accordingly.
Have fun blogging.

Link To This Complain:
Read more

April 18, 2010

Auto Post Summary Widget with Thumbnail for Blogger

There are a lot of benefits to include auto summary widgets in blogger blogs. If you notice many websites or blogs (in fact all) starts to use the auto read more scripts. The main benefit is that your blog will load faster and allow you to display more posting. It looks neater and your readers can also surf your blog with more ease and this will want to make them to return more often. It is definitely a plus recommended by most webmasters.

Blogger

Recently Blogger introduce the read more hack to Blogger templates. You can include the ‘Read More’ in any part of your posting. However, this add on by Blogger does not automatic generate a thumbnail and you have to add them manually. Click here to find out more about this add on by Blogger.

If you want an advance automatic post summary ‘Read More’ hack that automatically generate a thumbnail, use the below hack instead.

First of all I would like to credit this hack to Bloggerplugins.org, where I got the original script from.

Method
Log in to your Blogger’s dashboard, click on ‘LAYOUT’ tab and click on ‘EDIT HTML’. Tick the checkbox to ‘EXPAND WIDGET TEMPLATES’.

Backup and save a copy of your template before you do any adjustment.

Search for this line:
</head>

And replace it with:
<style>
#readmore
{
width:100px;
margin:3px;
background:#000 url() repeat-x center left;
color:#fff;
border:1px ridge #eee;
text-align:center;
cursor:pointer;
}
</style>
<script type='text/javascript'>
var thumbnail_mode="float" ;
summary_noimg=300;
summary_img=300;
img_thumb_height=150;
img_thumb_width=150;
</script>
<script src='http://kingofcomplain.googlecode.com/files/AutoSummaryPlugin.js' type='text/javascript'/>
</head>

Search for this line:
<data:post.body/>

And replace with:
<b:if cond='data:blog.pageType == "item"'>
<data:post.body/>
<b:else/>
<b:if cond='data:blog.pageType == "static_page"'>
<data:post.body/>
<b:else/>
<div expr:id='"summary" + data:post.id'>
<data:post.body/>
</div>
<script type='text/javascript'>
createSummaryAndThumb("summary<data:post.id/>");</script>
<div style='clear: both;'/>
<span style='padding-top:5px;;float:right;text-align:right;'><a expr:href='data:post.url' rel='bookmark'><div id="readmore">Read more >></div></a></span>
</b:if>
</b:if>

Preview it and CLICK SAVE and you are done.

Customization
You can edit the word count for these var/parameters:
summary_noimg=300; (Word Count with No Image)
summary_img=300; (Word Count with Image)
img_thumb_height=150; (Thumbnail Height)
img_thumb_width=150; (Thumbnail Width)

You can customize the 'Read More' button by changing the style. However if you do not want any style but rather just the simple 'Read More' text link removes this section of the above code:
<style>
#readmore
{
width:100px;
margin:3px;
background:#000 url() repeat-x center left;
color:#fff;
border:1px ridge #eee;
text-align:center;
cursor:pointer;

}
</style>

Have fun Blogging.

Credit:
Bloggerplugins.org

Link To This Complain:
Read more

April 16, 2010

Methods to Display/Hide Blogger Widget in Specified Pages

The default Blogger’s hosted blog will display widgets on all posts and pages. There can be times when you only want to display certain widgets on certain page. I display certain widgets only in post page as if I squeeze all my widgets in the list page, the loading will crash my readers PC if they are using Internet Explorer. I want my loading speed to be optimal. They can be a lot of reasons why to be selective and it is all up to your need.

Blogger

There are two methods which I used to display widgets on certain pages.

Method 1 – Installed the conditional tags in the body section of the template.
Method 2 – Installed the conditional tags in the head section of the template.

I prefer the second method as it look tidier to me and if I have to change the blog design, I will be able to remember which tweak I made before in the blog template.

Backup and save a copy of your template before you do any adjustment.

Method 1
Log in to your Blogger’s dashboard, click on ‘LAYOUT’ tab and click on ‘EDIT HTML’. There is a checkbox to ‘EXPAND WIDGET TEMPLATES’. For method 1 you need to expand the widget templates and dig in the mess of codes, this is another reason why I prefer using method 2.

Locate the widget ID (That is the particular widget you are messing with.) Search for this line,
<b:includable id='main'>
and apply conditional tag/tags just after it.

Search for this line
</b:includable>
a few lines further below the first line that you have just found previously. Close the conditional tag/tags just above this line.

Here is an example to display a widget only in home page.

<b:section class='Sidebar' id='Sidebar2' maxwidgets='1' showaddelement='no'>
<b:widget id='HTML999' locked='true' title='TabSideBar' type='HTML'>
<b:includable id='main'>
<b:if cond='data:blog.url == data:blog.homepageUrl'>
<!-- only display title if it's non-empty -->
<b:if cond='data:title != ""'>
<h2 class='title'><data:title/></h2>
</b:if>
<div class='widget-content'>
<data:content/>
</div>
<b:include name='quickedit'/>
</b:if>
</b:includable>

Pictorial Description: Click on Image to Enlarge
Methods to Display/Hide Blogger Widget in Specified Pages

Below is the list of Conditional Tags;
Use this when you want to;

display the widget only in home page;
<b:if cond='data:blog.url == data:blog.homepageUrl'>

display the widget in home page, archive and label page;
<b:if cond='data:blog.pageType == "index"'>

display the widget only in post page;
<b:if cond='data:blog.pageType == "item"'>

display the widget only in static page;
<b:if cond='data:blog.pageType == "static_page"'>

display the widget only in archive page;
<b:if cond='data:blog.pageType == "archive"'>

display the widget only in specific page;
<b:if cond='data:blog.url == "http://kingofcomplain.blogspot.com/2009/05/showing-widget-on-specific-pages-in.html"'>

You can also work the other way round by hiding the widget in certain page.
Use this when you want to;

hide the widget only in home page;
<b:if cond='data:blog.url != data:blog.homepageUrl'>

hide the widget in home page, archive and label page;
<b:if cond='data:blog.pageType != "index"'>

hide the widget only in post page;
<b:if cond='data:blog.pageType != "item"'>

hide the widget only in static page;
<b:if cond='data:blog.pageType != "static_page"'>

hide the widget only in archive page;
<b:if cond='data:blog.pageType != "archive"'>

hide the widget only in specific page;
<b:if cond='data:blog.url != "http://kingofcomplain.blogspot.com/2009/05/showing-widget-on-specific-pages-in.html"'>

You can add as many tags as you like only to remember to apply closing tag to all of them.

Method 2
You don’t have to ‘EXPAND WIDGET TEMPLATES’ in this method. Find this line
</head>
and apply the opening and closing tags directly above it.

Here is an example to display a widget of ID HTML999 only in home page. You will need to add in the CSS style also.

<b:if cond='data:blog.url != data:blog.homepageUrl'>
<style>#HTML999{display:none;}</style>
</b:if>

</head>

Here is an example to hide a widget of ID HTML999 only in home page.

<b:if cond='data:blog.url == data:blog.homepageUrl'>
<style>#HTML999{display:none;}</style>
</b:if>

</head>

You can add as many tags as you like also in the second method. The conditional tags in method 1 are applicable in method 2. Method 2 is just in reverse with method 1 with the same functions. Thank you for reading and let me know if it helps.

Link To This Complain:
Read more

April 11, 2010

Alternate Methods to add Google Search Box in Blogger Blog

I was searching for alternate methods to add a search box in Blogger. The default navigation bar that provides a search box on the top of Blogger’s blog is very boring, I wanted a more customized search box for my blogs.

UPDATES: All the methods as here is only a SIMPLE FORM SEARCH. Subscribe to my news letters and i will update you some more regarding the AD-SENSE PART ASAP.

Alternate Methods to add Google Search Box in Blogger Blog

Later Google provided bloggers with a search function in their “add a gadget” section and they introduced a free Custom Search Engine (CSE) for any website as well. The problem with these two options introduced by Google is that by following their default instructions to install the search box, the blog may take too long to load.

So here, I am showing 3 alternate methods to add the same search box with similar functions using forms, it is using simple HTML, and therefore the loading time will be lightning fast.

Just cut and copy the below HTML code to any where you want it to appear in your blog.

Method 1
The default search box provide by Blogger. If you have removed your navigation bar on top and you still want the same search box that comes along with it.

Method 1 Demo


Method 1 HTML code


Method 2
This method is simply a search box based on the normal Google search engine. However this method will only display results from within your blog. You will need to change the ‘http://YOURSITE.blogspot.com’ address to your blog URL in the HTML code below.

Method 2 Demo


Method 2 HTML code


(Method 2 - Variation)
You can add a checkbox for your readers to choose from just searching the web or just your blog. Use this form instead.

Method 2 Variation Demo


Search this BlogWeb Search


Method 2 Variation HTML code


Method 3
This method is a modification of Google’s product Custom Search Engine (CSE). They provide a free CSE for anyone; a paid upgrade is available though. However CSE provide JavaScript codes which sometimes slow the blog loading time. So here below is the alternate HTML method.

1. Sign up with Custom Search EngineCustom Search Engine and after you get your Search Engine.
2. Find your Search Engine Unique ID and replace it in the form below.

Method 3 Demo


Method 3 HTML code


Note that I have added a simple JavaScript to all three methods and that is when the default text is on focus, it will automatically disappear. This will make things easier for your user as they do not need to delete the text before they enter a new key search.

Also if you would like your search results to open in a new window. Just add this code.
target="_blank"

to your new search box.

Example:
Original Code:
<form action="http://www.google.com/cse" id="cse-search-box">

Add your the extra code here as shown below;
<form action="http://www.google.com/cse" id="cse-search-box" target="_blank">

There are many ways to add a search box using simple HTML forms. However, I believe Google is the favorite as they currently have the largest database and that probably also contain more information form your blog then the other search engines.

Thank you for reading. Please link to this post if it helps and feel free to comment and ask.

More reference:
Google Custom Search Engine official site.
Google Simple Search Box and guidelines.

Link To This Post:
Read more

April 10, 2010

Read More/Jump Break Add On by Blogger

Blogger

Recently (Not too Long Ago) Blogger introduce the read more hack to Blogger templates. You can include the ‘Read More’ in any part of your posting. However, this add on by Blogger does not automatic generate a thumbnail and you have to add them manually. This is call 'Jump Break'

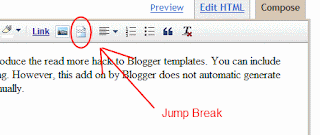
In your posting, switch to 'Compose' mode and you will see the logo. Refer the diagram below:
JumpBreak Blogger

Just click on this Jump Break any where you would like Blogger to truncate your posting.

If you are using HTML mode, use this to shorten your post.
<!--more-->

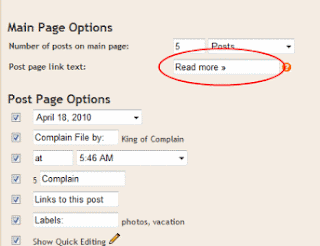
You can change the 'READ MORE' to any text you like by:

Clicking on ‘LAYOUT’ tab and click on ‘Page Elements’. Click on the 'EDIT' on Blog Post.

JumpBreak Blogger

Thank You and Happy Blogging...

Link To This Complain:
Read more

May 2, 2009

How to Submit Blogger Blog URL and Sitemaps to Major Search Engines

This post might look long but I have combine the complete process to submit your Blogger blog URL and sitemaps to the major search engines in one post. It is basically to tell the search engines on the contents of your blog. The contents of a new blog will not appear in the search results from the search engine and if your blog post does not appear in the search results, then how are unknown potential readers going to find your blog? So it is worth it to submit your Blog to them.

There are many search engine in the world, however by submitting sitemaps to the ‘3 big’ will be sufficient. The ‘3 big’ are Google, Yahoo and MSN Bing/Live. Many search engines fetch their results from the ‘3 big’. If your blog get indexed by the ‘3 big’, it will also appear on the result page of other search engines.

When submitting a sitemap to the search engines, it is not a guarantee incursion. It will take anytime from 1 day to months before they crawl and indexed your blog. The time difference will depend on the content of your blog. The search engines can see whether if your blog have unique contents or it is just a cut and copy blog. Usually, Google will be the first to index your blog, followed by Yahoo and MSN.

When you host your blog under Blogger, even if you did not submit a sitemap to them, sooner or later Google will index them. Though Google will index your blog automatically, you can still submit a sitemap to Google Webmaster Tool. The robots will index your post faster every time a new post is up. Google Webmaster Tool will also tell you the status of your indexing. For example: You might have accidentally tag a no index tag to the entire blog without knowing it and the whole blog does not get indexed. Google Webmaster Tool will highlight this to you so that you can fix the issue fast.

Methods:

1. Summiting Blogger Sitemap to Google Webmaster Tool

Blogger and Webmaster Tool are both owned by Google, so you do not need to create a new account or go thru the verification process for Google Webmaster Tool.

  • Go to [Google Webmaster Tool] and log in with your Blogger/Google account.
  • Click on “Add a Site…
  • Enter your sitemap format as:
    http://YOURBLOG.blogspot.com/atom.xml?redirect=false

This is the most default sitemap format to submit to Google and it will work just fine.

You can also submit your URL direct to Google. Just click on this [link] and followed the instructions. (This, I personally think it is an unnecessary extra step.) If you decided to submit your URL directly to Google, it is advisable that you have at least 10 posting and make sure that it is not cut and copy junks.

2. Summiting Blogger URL to Yahoo Site Explorer
  • You need to create a Yahoo account if you do not have one.
  • Go to [Yahoo Site Explorer] and log in with your Yahoo account.
    Upon log in, you will see “Add My Site”.
  • Enter the your blog URL in this format:
    http://YOURBLOG.blogspot.com/
  • Yahoo Site Explorer will require you to authenticate your blog, choose “By adding a META tag to my home page.” (The other option is for when you host the blog yourself.)
  • Yahoo Site Explorer will provide you with a Meta tag that look like this: <META name="y_key" content="d8xxxxxxxxxxxxxx">.
  • Log in to your Blogger’s dashboard, click on ‘LAYOUT’ tab and click on ‘EDIT HTML'. (Don't have to expand the widget templates).
  • Find this piece of code: <head> and paste the Meta tag provide by Yahoo Site Explorer directly below it.
  • You need to parse the Meta tag by adding a slash so it looks like this: <META name="y_key" content="d8xxxxxxxxxxxxxx"/>.
  • Click on “Ready to Authenticate” and there will be a confirmation message to tell you that your blog has being verified.

Submitting your Blogger Feed to Yahoo Site Explorer
After you submit your Blog to Yahoo Site Explorer, you might want to submit a sitemap to Yahoo Site Explorer as well. This will give Yahoo more details of your blog contents.

  • Click on “Feeds
  • Enter your sitemap in this format:
    http://YOURBLOG.blogspot.com/atom.xml
    and/or
    http://YOURBLOG.blogspot.com/rss.xml.

3. Submitting your Blogger URL and Feed to MSN Bing Webmaster Center
  • You need to create a MSN account if you do not have one.
  • Go to [MSN Bing Webmaster Center] and log in with your MSN account.
    Enter your web address as:
    http://YOURBLOG.blogspot.com/
  • Enter your sitemap in this format:
    http://YOURBLOG.blogspot.com/atom.xml
  • MSN Bing Webmaster Center will provide you with a Meta tag that look like this:
    <meta name="msvalidate.01" content="CFXXXXXXXXXXXXXXXXXXXXF5A" />
  • Log in to your Blogger’s dashboard, click on ‘LAYOUT’ tab and click on ‘EDIT HTML'. (Don't have to expand the widget templates).
  • Find this piece of code: <head> and paste the Meta tag provide by MSN Bing Webmaster Center directly below it.

You are done submitting your Blog URL and sitemaps to Google, Yahoo and MSN. Now all you need to do is to wait while you blog. You can log in to the various accounts for indexing status.

If you think this post is useful please link to me and happy blogging. All comments are welcome.

Link To This Complain:
Read more
 
This work is licenced under a Creative Commons Licence.
(c) 2010 Blogger Theme "Sleek Minima" designed by King of Complain. All Rights Reserved. Powered by Blogger.
KOC Toolbar
Review for King of Complain
Back to Top